Showing posts with label life hacks. Show all posts

Thursday, April 14, 2016

DIY: Binder Privacy Dividers

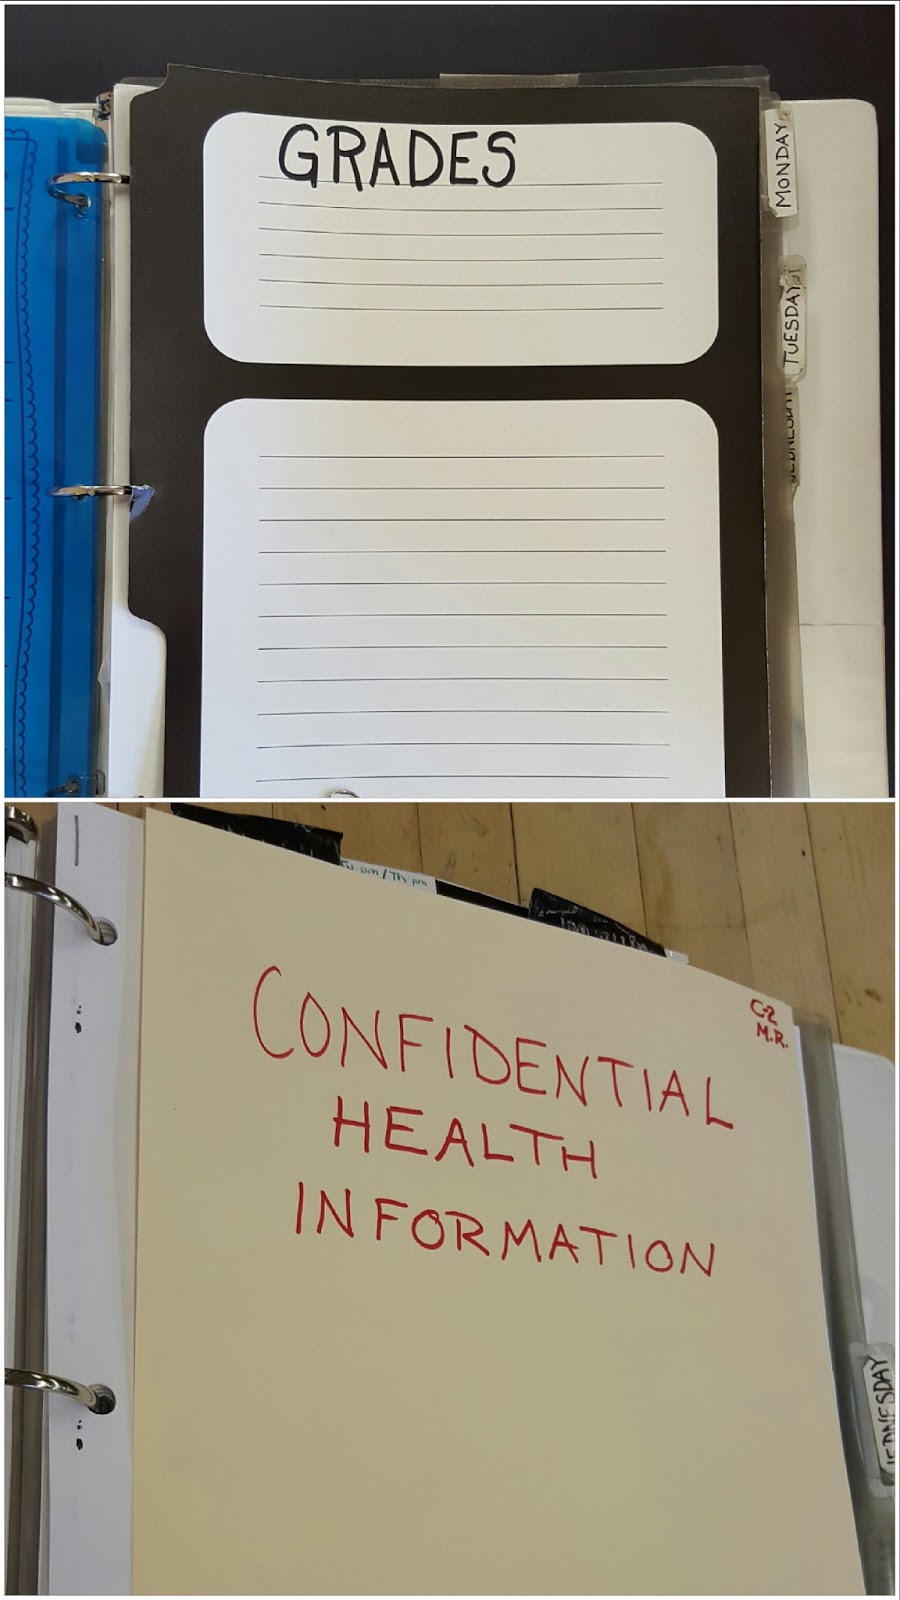
This trick works really well for
IEP's, health info and grades!
by Elizabeth Van Allen  for scribblesbyartteachervanallen.blogspot.com

When I figured out this easy trick to keep binder sections private I honestly face-palmed.  Maybe it's obvious to others, but to me this was a revelation.  You'll never have to worry about accidentally sharing the confidential information in your binder again!

The Issue: I'm obligated to have confidential information like emergency plans for student seizures immediately accessible, but they also must stay private. 

The Solution: Use a file folder to create an easy-access privacy divider!

Quick & Easy Directions:


1. Get a standard-sized file folder. 


2. Open the folder.  Cut off the tab on one edge.  Trim approximately 1/2" or 1.5cm from the opposite edge (the area with the tab cut-away). The 2 halves of the folder should NOT be equal.

3. 3-hole punch the wider half of your folder.  Make sure that you center the punch along the edge, folders are taller than standard paper.

4. Insert the folder hole-punched side down in your binder so that it opens backwards.  Unfold your new privacy divider, insert confidential info into the binder, and close the folder over your documents (scroll up to the first picture to see two finished product).  The privacy divider can easily be kept closed using a paper clip or two!


What easy ways have you found to solve your everyday organizational problems?


Share with us by leaving a comment!

If you liked this organizational tip, 
check out my ideas on labeling systemsorganizing paperwork, and favorite problem-solving items!

Thursday, March 24, 2016

Prepare for Art Teachering Success!

by Elizabeth Van Allen for scribblesbyartteachervanallen.blogspot.com

Being a good teacher is hard work, but being a successful teacher takes some serious trial-and-error.  As a gift to other art teachers out there, I'd like to share ten tips and hard-learned lessons I've learned that make my everyday teacherin' life a little bit easier.  Everyone makes mistakes (see #10), but in sharing my experiences I hope to help other teachers enjoy more moments of success and better preservation of their sanity.
Preparing to Succeed
An Art Teacher's Guide

My grab-and-go kit: Rory's Story Cubes,
color & shape bingo, Beautiful Oops, paper,
instructions for simple book making projects,
crayons, colored pencils, and coloring pages.
1. Have a grab-and-go class coverage kit ready at all times
When another teacher's parent conference or last-minute absence happens during your prep period, you might get called on to cover their class.  Getting advance notice of a coverage is often a luxury, so prepare yourself with activities that are suitable for a variety of ages and are easy to modify!

2. Always leave your classroom sub-ready
You never know what is going to happen after you exit school for the day, so make sure that nothing is left to chance.  Lock up things that are not for students, have sub plans easily accessible, and make sure the room is tidy.

3. Streamline your paperwork
I like to have frequently used data at my fingertips.  Behavioral notes & attendance are on my seating chart, and contact info & grades are on a roster sheet.  The pages face each other in my binder for easy access.
4. Find an organizational system that is easy to maintain, then stick with it
Have easy-to-understand systems for organizing student work, paperwork, and student procedures. Being disorganized in an art room is like trying to clean up a gallon of paint with one paper towel.  It might work eventually, but you'll have a heck of a mess on your hands!

5. Keep guidelines clear and simple
When you clearly post simple rules and procedures, you eliminate confusion and frustration for you and your students!
6. If a student can do something, let them
There is no reason to clutter your mind with project distribution when you are tasked with facilitating the education of 30+ students while also keeping them safe.  Use your first few classes to teach and reinforce classroom rules adn procedures, then hold them accountable.  Make your classroom a more student-driven educational environment while keeping your eyes and ears open for teachable moments and potential issues!

7. Common sense is not the same for everyone
Positively worded rules get better results!
Dictionary.com defines common sense as sound practical judgment that is independent of specialized knowledge, training, or the like; normal native intelligence.  Remember: sound and practical looks very different to an adult from the suburbs than it does to child from the inner city. 
8. Become indispensable
When school and district budgets get tight, art education is one of the first areas to get cut.  This is often due to the perceived expense of running a quality program.  Make yourself an important part of your school's culture and a valued member of the school community by volunteering for initiatives and building committees.  Being an intrenched, highly visible, and POSITIVE influence makes keeping you in your position a higher priority.
My art advocacy bulletin board 
features Eisner, Gardner, and 
tons of art-based career choices!
9. Be an informed advocate
Advocating for your subject, program, and students makes you a force for positive change.  Gandhi is often quoted as having said "Be the change you wish to see in world." Show, tell, and demonstrate why and how art is important, but check your facts first.  If you're not sure where to start, try looking up the philosophy research of Elliot Eisner through reading his work or hearing him speak.  You can also print a copy of his 10 lessons the arts teach to post in your classroom!

10. Learn from your mistakes
We all make mistakes, it's part of life.  The biggest mistake that I made during my first few years as an art teacher was taking myself too seriously.  It stunted the development of my relationships with both my students and other adults.  The first few years of teaching is hard enough as it is, I made my own life far more difficult than it should have been by leaving my sense of humor at home.  Recognize when you've made a mistake and take the time you need to reflect.  What went wrong?  How it could be fixed or done better in the future?  Ask for help when you need it and don't forget to celebrate your victories... you earned them!

Bonus tip: Test run every project with the exact same supplies that your students will be using.  It may be a pain in the neck, but troubleshooting your lessons in advance makes for a much smoother and enjoyable classroom experience for everyone!


What would you add to the list?
Share with us by commenting below!

Thursday, April 16, 2015

I'm bringing calmness back.

by Elizabeth Van Allen
scribblesbyartteachervanallen.blogspot.com
Finding my happy place before a flight.

Time is short and kids can act crazy, so it's easy to get thrown off your game if you don't have a plan B in the classroom.  It doesn't hurt to also have plans C, D, and E waiting in the wings in case of emergency.  Every day a teacher's time management has to be on point 100% of the time.  Schedules can shift and change at a moment's notice, and let's face it- not every class goes according to plan every time.  It's way too easy to let your personal stressers travel with you from class to class, then follow you home as if you actually want them there. 

We always have back-up plans ready to go in the classroom, but what about your "real" life?  When things go sideways and unexpected stress hits, do you have anything in place to keep your mind centered?  I've put together four quick go-to fixes that just might bring some calm back into your life.  Hopefully you'll be a little more prepared when the next "life storm" hits!

Quick fixes for the suddenly stressed:


http://www.wikihow.com/Breathe
1. Breathe deeply with your mouth closed, especially if you are starting to panic.  Research has shown that you can't hyperventilate when breathing through your nose.  Slowly take the breath in through the nose until it completely inflates your chest, stomach and back over a slow 4-count (minimum).  Let it out slowly, taking the same amount of time -or slightly longer- to release the breath.  Continue to exhale until you are pushing the last of it out with your diaphragm.  Repeat a few more times.

2. Take a brief stretch break. Extend your arms and your gaze all the way up.  Reach towards the ceiling/sky with not only your hands and arms, but your sides and waist too.  At the same time, root down through the earth with your shoulders, legs, and feet.  Reach up a little higher with alternating hands to really stretch your sides and triceps.  Then hinge at the hips and, with control, reach out and sweep your hands down towards the floor.  Bend your knees one at a time, stretching through your standing leg and hip before you switch.  Be careful not to lock or hyper-extend you knees, and don't forget to breathe! 

https://greenifytoday.wordpress.com/2015/03/02/move-it-
monday-try-these-3-great-morning-stretches/comment-page-1/

http://boards.philadelphiaeagles.com/topic
/700105-week-4-patriots-chiefs/

3. Grab a crayon and scribble.  If it sounds silly, that's because it is.  Take one of those big, made-for-toddlers crayons and hold it in your fist.  Now scribble your heart out.  Get all that frustration out on the paper, then crumple it up and throw it away.  It's kind of like punching a pillow, only a little (ok, a lot) less obvious to others.

4. Be fully present in the moment and truly enjoy a sensory experience.  It could be the warmth and scent of a cup of tea, the taste and texture of your lunchtime sandwich, or even just feeling the sensation of running water as you take an extra minute to wash your hands.  Really indulge yourself in the simple pleasures that smell, taste, touch, sound and sight have to offer.
I recently tried jackfruit for the first time (pictured above).  Instead of immediately judging whether or not I liked it, I tried to be fully present while attempting to describe my sensory experience more objectively to a captive lunchtime audience. (Thanks Mom & Kat!)  It was a really interesting way to try something new.


What stress-reducing quick fixes have worked for you?

Thursday, February 5, 2015

I'm not Oprah or Julie Andrews.

by Elizabeth Van Allen for scribblesbyartteachervanallen.blogspot.com/

Nobody would ever mistake me for Julie Andrews or Oprah (not that I wouldn't mind having that kind of influence), but that doesn't mean I can't give a shout out to a few favorite everyday, make-life-a-little-easier things that I love.  I can't give them away and if I sing about them you might change the channel, so I'll make this a quick commercial break of unsolicited and unpaid (hint hint ahem) product plugs.


Tip: Attach a piece of cardboard
to the inside lid of a storage
case to test your markers!
Favorite Tool: Paint Pens

I use sharpie oil-based paint pens for everything in the classroom from posters and signs to labeling student tables.  These amazing paint pens don't bleed, run or fade.  When laminated the paint stays true to color and keeps a sharp edge.  While I wouldn't let my students use them due to their slight odor, extreme permanence and cost, they are a permanent addition to my teacher toolkit. 


Favorite Comfort: oz Miracle Insole

If your feet ache at the end of the day give these a try!  Your tootsies will be back to normal in no time thanks to the magic of the 2 oz Miracle Custom Molding Insole.  I've tried just about every reasonably priced insole on the market and I keep coming back to these.  The 2 oz miracle costs less than $10 and can usually be purchased in more budget-minded grocery stores.  They last forever and are easy to trim to the right shape/size.  I've used them in everything from flats to heels to boots.  Since they're super thin they work without changing the fit of the shoe.  


Favorite Impulse Buy: Stoppy

My art room has very heavy doors that are not a normal distance from the ground.  Consequently, regular doorstops are useless in my classroom.  For two years I had to tie my door handle to the handle of an exit door in order to keep it open for conferences and back-to-school nights.  In my head I sound like a bad infomercial salesman as I write this, but I've finally found my answer.

I have the solution to all of your doorstop needs and it's called the Stoppy.  Now go back and re-read that last statement, but imagine that the sound in your brain has just been turned up to 11 and I am shout-talking in a very enthusiastic manner.  Go ahead, I'll wait.  Seriously though, this Stoppy door stop is amazing.  If you ever see these in the store, get one.  Infomercial over.  

What products have made 
your everyday life 
a little more user friendly?

Thursday, July 24, 2014

Uncommonly Common Sense

by Elizabeth Van Allen
for scribblesbyartteachervanallen.blogspot.com/

I've found in the past few years that common sense isn't nearly as common as one might think.  A while ago I found a graphic posted online that seemed to embody the concept of common sense when applied to life as a whole.  I know- common sense online...  who would have thought? This post stuck in my mind so tenaciously that I drew a flow chart to illustrate.  Please feel free to use this chart liberally, there's always room for improvement!

Disclaimer: I don't remember where I found the original image, it was probably on imgur.  If you do see the original, please send me the link so I can reference it here!

Thursday, July 3, 2014

Extra! Extra! Dried markers are no longer trash!

by Elizabeth Van Allen
for scribblesbyartteachervanallen.blogspot.com/

Like most art teachers, at the end of the year I find myself with a bazillion dried out markers.  And like most other art teachers, I find myself unable to throw them away.  Markers can eat up such a huge chunk of your budget in the beginning of the year, it seems like such a waste!  I made a discovery recently that blew my mind...

YOU CAN PAINT WITH DRIED MARKERS! 

Materials:
  • Dried Markers
  • Water Cup
  • Coloring Sheets or Paper
  • Paint Brush (optional)
  • Imagination
Process:
  1. Dip a dried marker once into your water
  2. Use it to color/paint
  3. If desired, use a wet paint brush to spread the ink around a little more!
That's it... there's no trick.
I also heard a rumor that you can make liquid watercolors by soaking dried up markers in small containers of water.  All of this sounds so obvious now, but it sure would have helped if I had known about this years ago!

What ways have you found to utilize old supplies that you thought were all used up?  

Don't keep us in the dark, post below to 
share your money-saving secrets!