Showing posts with label semi-homemade. Show all posts

Thursday, January 8, 2015

Making It Mine

by Elizabeth Van Allen 
for scribblesbyartteachervanallen.blogspot.com

Personalizing My Yoga Bag
I like to personalize my stuff.  I don't know if it's just an artist thing, but I don't like looking the same as everyone else.  This summer when I stayed in Disney World I needed a way to mark a few towels as mine so that they wouldn't get gathered up by housekeeping with the rest of the linens.  I know it sounds funny, but I bring my own face towel when I travel because my skin won't tolerate the bleach hotels use.  When it comes to personalizing towels, patches and painting were both out as options.  What I needed was something that would hold up well with frequent washing and drying.

Embroidered Face Towel 

Being a glutton for punishment, I decided to delve into the world of embroidery.  To give you a little background on my grand plans in needlework, I started really experimenting with sewing in high school. I decided one day that I wanted to make a dress with a fitted bodice and a strip-work, ankle length skirt.  I hadn't made much past simple pillows, but I'd watched my mother make clothing, curtains and quilted stuff tons of times.  How hard could it be?  Mom got pretty worried when I confidently stated my intent, but she patiently walked me through it and I wore my dress for years.  In that same tradition, I decided that one of my first embroidery projects would be a multi-hued purple lotus flower that looked the same on both sides of a face towel.  If you've ever see the back of a piece of embroidery or needlepoint, you know that is not exactly the status quo.  


Embroidered Yoga Towel
My Yoga Bag and Towel


I added a multi-colored running stitch
 at the seams to brighten up my gym bag


I did some research and finally got it right.  I successfully embroidered the same lotus on my face and yoga towels and figured out first hand why an embroidery hoop can be a very useful tool.  


My next challenge: my gym and yoga mat bags.  I think I nailed it! 


How have you personalized some of your favorite things?

Thursday, December 25, 2014

Don We Now Our Ugly Sweaters

Even though it isn't actually ugly
 this Alex Stevens sweater from
Amazon won me over.
by Elizabeth Van Allen
scribblesbyartteachervanallen.blogspot.com/

Aaah, winter... season of snow, hot chocolate, re-connecting with friends & relatives and donning our ugly sweaters.  That's right folks, I hopped right up on that bandwagon this year with no regrets.  I followed the lemmings off the sidewalk and right into the check-out line.  Who am I to question such a fun and openly ridiculous trend?  Seeing that I always have impeccable taste (I heard you laughing!), I actually had to go out and purchase one.  As so many of my fellow lemmings had already beaten me to thrift stores, TJ Maxx and Marshalls, I resorted to going online.  Did you know how much these things cost?  The retail price before discounts seems to average $30-$60!  I gathered my coupon codes and waited for the right time to strike.  Helloooo Amazon.com!
You'd think that just the sweater would be enough.  Nope, I had to go that extra mile and add lights.  I attached these babies to my sweater with twist ties in mere minutes!  My students kept asking me where the lights were plugged in.  After a while I stopped showing them the battery pack and answered with "my belly button, of course!"  Their faces were priceless.

No ensemble would be complete without coordinating accessories.  Enter my holiday hat/fascinator/headband. No ordinary buy-it-at-CVS santa hat would do, I HAD to personalize it according to some very rigorous specifications.  Thanks to my local craft store I combined a mini elf hat headband with an ugly sweater ornament!
Hidden bonus: a homage to 1994's olympic ice skating drama!
Apparently my first ugly sweater attempt qualified as a fail. Here's what a co-worker of mine overheard from an 8th grade girl in the hall: "That's supposed to be an ugly sweater?  She won't win any prizes because that sweater's not ugly.  I'd wear it."  I guess you can't win 'em all, but in this case I think that losing is a little more like winning, at least in the eyes of the fashion police.


What did you do to spread a little extra holiday cheer this season?


Tuesday, November 25, 2014

Fairy Art Mother: Evolution of a Costume

The original sketch for my costume
by Elizabeth Van Allen
scribblesbyartteachervanallen.blogspot.com/

Aaah, Halloween.  The one day a year when anyone can dress as anything and totally get away with it.  Of course as an art teacher, you tend to get a free pass for dressing a little oddly throughout the year.  We like to call it creative, others may label it eccentric, but I digress.  

My costume this year is nothing less than, well, a concentrated version of me.  I was inspired by a few posts I saw online to transform myself into your very own Fairy Art Mother.  Being  the person I am, it was accompanied by a one-day lesson complete with powerpoint, because what teacher's costume is complete without a curricular tie-in?
A more refined sketch developed as I assembled the costume

What is a Fairy Art Mother?  I'm so glad you asked!  Accrding to Tanya Cole,  a fairy art mother is a creature who will 
'banish any unwelcome gremlin sitting on my shoulder whispering negative thoughts in my ear.' Basically, she's someone who gives you encouragement to keep going when you feel like giving up and trashing your own artwork.  The idea originally came from Tamara Laporte’s Lifebook course (http://willowing.ning.com/), I drew inspiration and borrowed text from http://tanyaannecoleartist.com/2013/01/02/latest-creation-my-fairy-art-mother/.


The Finished Costume

I started each class by announcing that Ms. Van Allen was in a very messy and colorful accident involving quite a bit of paint and that I, her Fairy Art Mother, would be taking her place for the day.  The Costume was a complete success.  My principal couldn't look at me without laughing, my colleagues loved it, and the students actually started telling each other to call me fairy art mother instead of Ms. Van Allen.  I'll always remember being swamped by students 
within 30 seconds of stepping out into the schoolyard.  I'm not sure how I could possibly top this costume, but with only a year to plan I'd better get started! 


What are some of the most memorable teacher costumes you've seen or worn?

Thursday, November 20, 2014

Semi-Homemade: Art Fairy Wand

by Elizabeth Van Allen
for scribblesbyartteachervanallen.blogspot.com/

My self-proclaimed crafting specialty is semi-homemade.  This skill developed out of a serious annoyance that kept on popping up.  I was just never able to find exactly what I needed or wanted until two years after I'd settled on something else.  I'm not kidding, it always takes two years for my ideas to hit the market.  I don't know about you, but I just don't have the patience to wait that long.  From personalized sneakers to tailored tops, from specialty-use aprons to custom-painted coffee tables, my lack of patience often ropes me into hours of enjoyable/frustrating/fulfilling crafting and sewing time.

That being said, you can imagine that I just can't settle for a bagged halloween costume. No, no, I have to go that extra mile, mile and a half.  This year I have developed/obsessed over/spent way too much time on a Fairy Art Mother costume, complete with wand and headpiece.  You'll see the whole thing put together in another post, but for now enjoy a little fairy wand DIY!


My Supplies

Materials:
  • Captain America Wand from a local party store
  • assorted ribbon
  • old paint brushes
  • 2 miniature paint palettes from a craft store
  • glue gun


Process:
  1. Design your wand. What's your theme? Figure out what you need, sketch it or write it down, and gather your materials.  If you have to buy anything, remember your coupons!
  2. Get a cheap, prefab wand.  Why reinvent the wheel?  Since this wand is for my Fairy Art Mother costume, I chose one that already included two of the three primary colors.
  3. Step 4- Attach Wand Base Pieces
  4. Prepare your working area by covering the surface with newspaper or cardboard.  I used a cardboard box top so that I could move everything quickly and easily from our dining room table and store it all together just in case I had to finish up at another time. If you are using a glue gun remember to put it on a non-flammable surface like tin foil or an old baking sheet!
  5. Step 5- Ribbon
  6. Attach any extra base pieces to wand. I chose to add a few old, broken paintbrushes using a silver twist tie and some hot glue.
  7. Fasten ribbon to the wand base. You'll cover up messy knots and gloppy hot glue in the next step.
  8. Add finishing touches like buttons, patches, bows, pictures, old barrettes, or in my case miniature paint palettes. These cover up any messiness and tie together your wand's theme or color scheme.
  9. Remove hot glue strings. Take another glance and make sure they're all gone.


Step 6-Finishing Touches

Step 6- Covering the Knots


What are some of your favorite 
semi-homemade shortcuts?

Thursday, November 6, 2014

Fascinating Fascinators DIY

My first fascinator
by Elizabeth Van Allen
for scribblesbyartteachervanallen.blogspot.com/

On a whim this summer, I decided to make a fascinator.  Of course at that point I had no idea they actually had a name, I just referred to them as those saucy little hat thingies.  Originally I made one to go with a dress I wore to volunteer at a childrens' fancy tea party.  It was being held at the library where my mother works, so of course I had to make one in a different style for her to wear.  Funny enough, fascinator making was one of the activities they had for the kids!  Apparently I'm not alone in my fascination for these little hats.  Maybe that's why they call them fascinators!  
Mom's mini top hat fascinator

Pretty soon I was trying to find an excuse to make another one.  Enter my Fairy Art Mother Halloween costume.  Yay for halloween!  Of course I went crazy coming up with ideas.  Eventually I settled on a painter's palette with other assorted rainbow-colored goodies thrown in there.  I sketched it out and got to work finding my supplies.

Planning my Halloween costume!


Materials:
  • Painter's palette- make sure it's the size you want.  I couldn't find one in the right size, so I traced one in the right shape, sized it down, cut it out of cardboard and covered both sides with wood grain contact paper. 
  • Crafty crap in assorted colors- that's my general term for the beads, shells, macaroni, sequins, feathers, puzzle pieces etc. that is inevitably in a box somewhere if you have kids, are artsy or are/know a teacher. 
  • A sturdy headband that fits your head without slipping OR a pre-made fascinator headband.  Believe it or not, I found mine for cheap at a drug store.
  • Ribbon
  • Felt
  • El-cheapo fascinator
      Pay close attention
       to step 2!

    1. Glue gun (of course)
    Process:
    1. Fit everything together BEFORE you take the tags off.  There's always something that doesn't quite work, even if you planned it out beautifully.
    2. Fully assemble any major pieces before attaching them to the headband.  This prevents the burns often associated with the combination of awkward angles and hot glue guns. 
    3. Securely attach the major pieces to the headband or base piece.  It's really tempting to break out the glitter and finishing touches, but if your base isn't firmly secured to the headband, it will fall apart before anyone sees it.  You can add a piece of felt under the base and headband to keep your hair from catching on any part of the headpiece.
    4. Work from the base up, making sure each piece is attached securely.
    5. Make sure that the fascinator is balanced when it's being worn.  If it's too heavy on one side you'll spend the whole time trying to keep it on your head.  Give it a test run for at little while, just to be sure!
    The Finished Fascinator


    Thursday, June 26, 2014

    Crayon-Inspired Footwear: My Very First DIY Tutorial!


    by Elizabeth Van Allen 
    Cassie's Crayon Shoes from  
    for scribblesbyartteachervanallen.blogspot.com/

    THE MISSION:
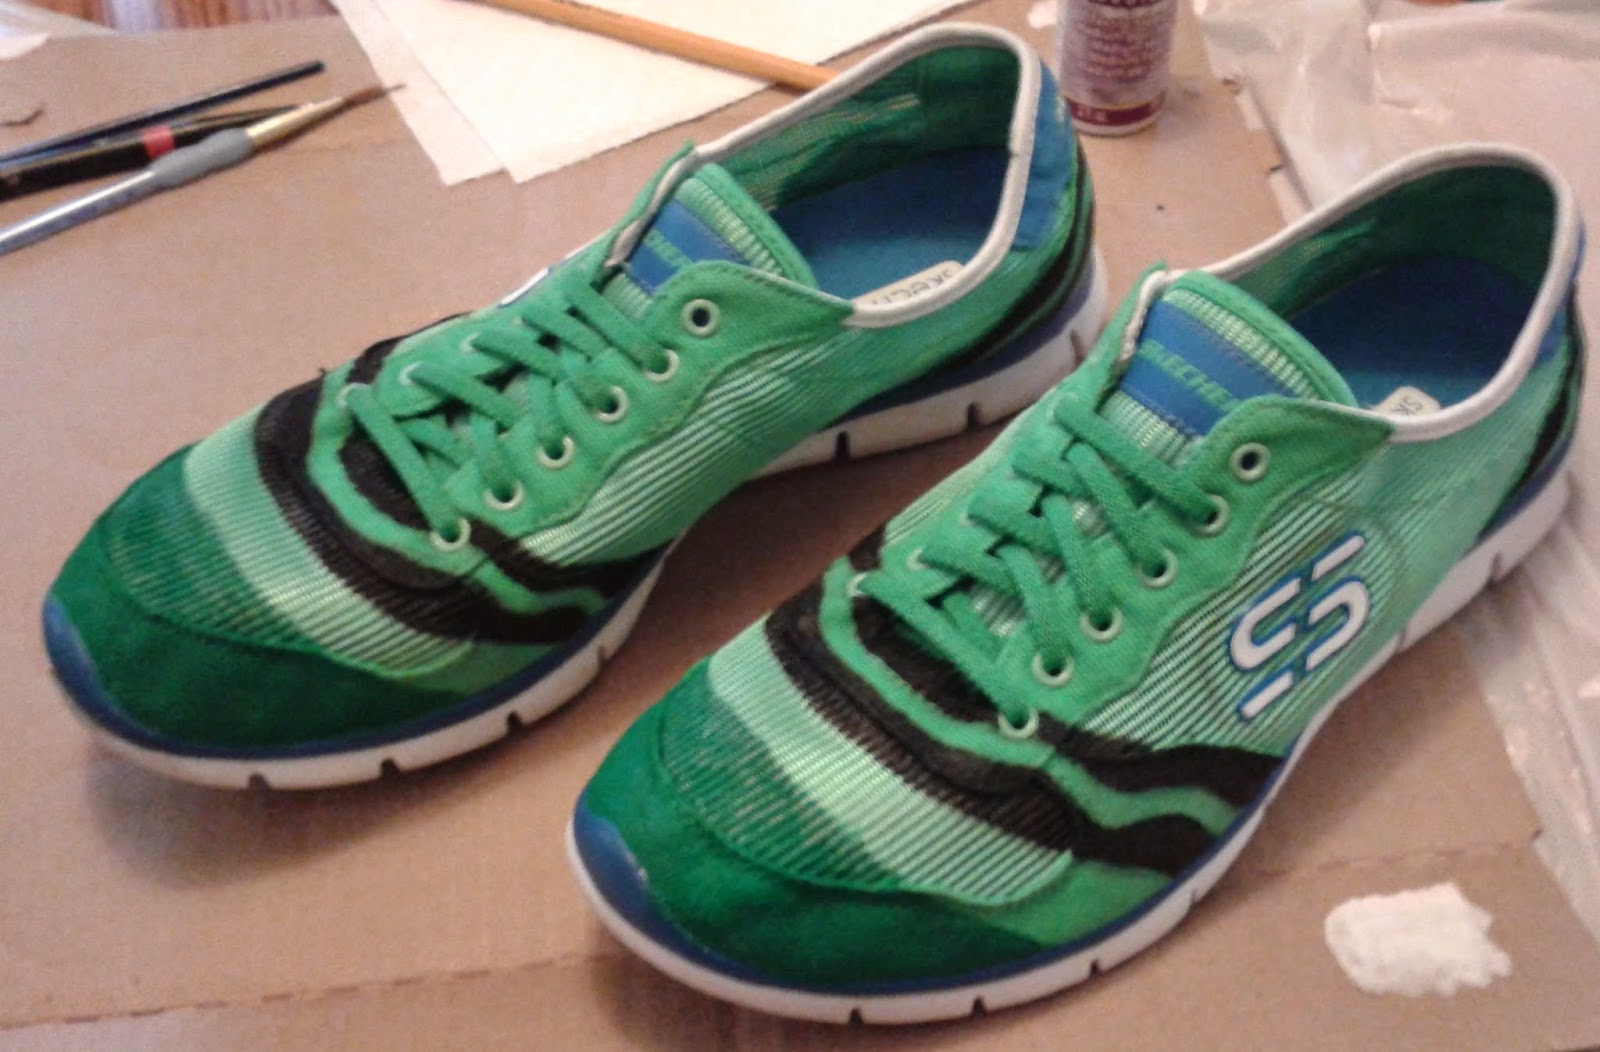
    I recently posted about my guilty pleasure art teacher blog by Cassie Stephens.  I absolutely loved her crayon shoes, so I made some of my own! 


    My Crayon Shoes

    Because comfort always comes first in my world, I used a pair of sneakers.  I had so much fun re-designing them that I decided to show it as my very first DIY tutorial. 


    THE MATERIALS:

    Golden acrylics are my fave!
    -Sneakers or canvas shoes, new or clean and dry
    (these were rescued from my ‘donate this eventually’ pile)
    -Fabric Paint or Acrylic paint and Textile medium
    Textile or fabric medium is available at any craft store with the acrylic/craft paints.
    If you use fabric paint you don’t need textile medium, it’s already formulated for fabrics.
    -Paint brushes (I never skimp when buying brushes, the quality really matters!)
    -Water cup
    -Newspaper
    -Something to mix your paint on (paint palette, yogurt lid or wax paper will do)

     THE PROCESS:

    Step 1: Plan
    Sketch out the plan for your shoe re-design.  There are some great sneaker templates online if you want to work on your idea but have trouble drawing the shoe shape right (or if you are impatient like me).  When you are ready, draw outlines of your design with a pencil directly on the shoe.


    Step 2: Prepare Your Workspace & Materials
    Shoes:
    If your shoes are not new, make sure they are clean and fully dried.  If they are new, wipe them with a damp cloth to get rid of any dust or lint. 

    Workspace: 
    Cover a flat, stable surface with newspaper or a plastic bag for easy clean up.  I like to use masking or blue painters tape to keep it from sliding around.

    Materials Set-Up:
    Have all of your materials within reach.  Fill your water cup about halfway because if you’re anything like me you’d rather clean up half a cup of water than a whole one when you knock it over!

    TipIf you’re mixing acrylic paint with textile medium make sure to read the directions first.  Brands vary in formulation, so using the correct ratio is important.


    Step 3: Get Working: Tips For Better Results

    Stabilize the fabric of the shoe with your non-dominant hand to make painting the flexible surface easier!

    Two or three smooth, thin coats of paint look better and last longer than one thick coat.  


    Use smaller brushes when painting in smaller areas of your pattern.  I kept several different sizes and shapes (rounded, flat, angled, tiny detail, etc.) close by and switched between them when I needed a better tool to get the job done right. 
      
    When you make a mistake, go with it.  There’s nothing you can do and the paint should be permanent if you prepared it correctly, so what’s the point in getting frustrated and giving up? 

    I rolled with my ‘oops’ when the first part that I painted ended up being a section of the design that was supposed to stay blank.  I changed the angle of the stripe and was happy that I hadn’t drawn on the shoe in marker!

    If you don’t like it, change it!  When I was initially finished I wasn’t happy with the end result.  After complaining internally and making what I’m sure were some ridiculous faces, I came to the conclusion that my work was not yet complete.  I took another look at my inspiration (see above) and at an actual crayon before running upstairs for more paint.  I had included the wrapper in my design, but in my excitement I completely forgot about the crayon itself!  For me, the darker green toes made the shoe re-design complete.

    Special thanks to Steph and Ben Vaughan for helping me through my over-zealous creative binge while they were here from London, my friend Shama for her input and to my husband Dave who kindly provided both paint, patience and lunch! Also, a big thank you to Cassie Stephens for permission to reproduce her image & reference her blog!


    When was the last time you followed the urge to binge-create?


      Tell us what you were inspired to do and send a picture to artteachervanallen@gmail.com