Showing posts with label classroom organization. Show all posts

Thursday, April 14, 2016

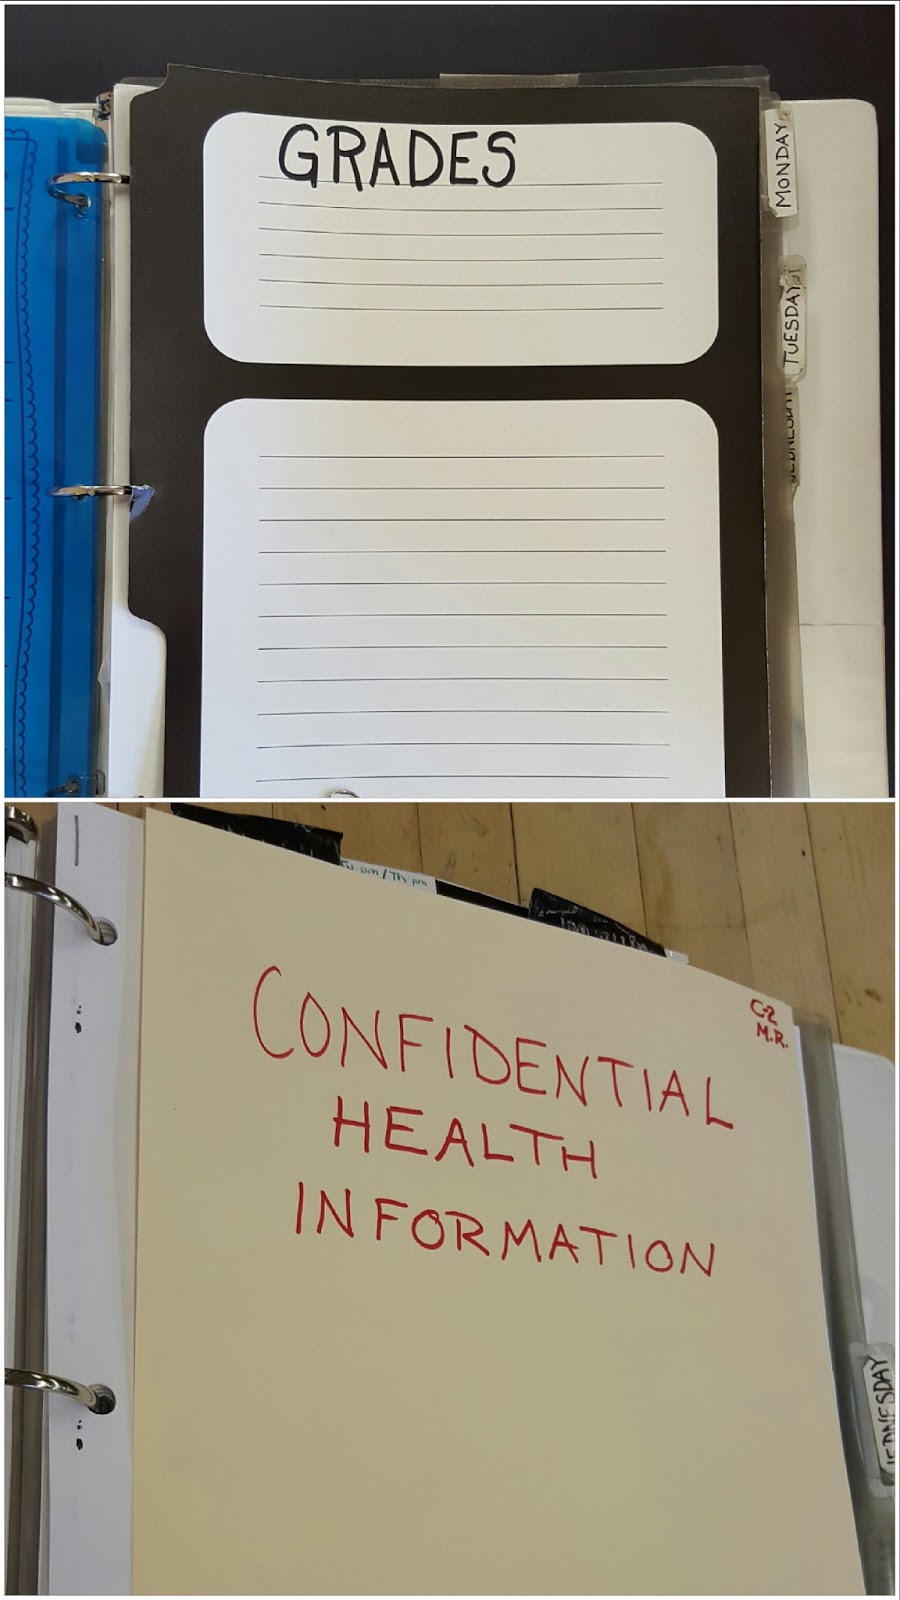
DIY: Binder Privacy Dividers

This trick works really well for
IEP's, health info and grades!
by Elizabeth Van Allen  for scribblesbyartteachervanallen.blogspot.com

When I figured out this easy trick to keep binder sections private I honestly face-palmed.  Maybe it's obvious to others, but to me this was a revelation.  You'll never have to worry about accidentally sharing the confidential information in your binder again!

The Issue: I'm obligated to have confidential information like emergency plans for student seizures immediately accessible, but they also must stay private. 

The Solution: Use a file folder to create an easy-access privacy divider!

Quick & Easy Directions:


1. Get a standard-sized file folder. 


2. Open the folder.  Cut off the tab on one edge.  Trim approximately 1/2" or 1.5cm from the opposite edge (the area with the tab cut-away). The 2 halves of the folder should NOT be equal.

3. 3-hole punch the wider half of your folder.  Make sure that you center the punch along the edge, folders are taller than standard paper.

4. Insert the folder hole-punched side down in your binder so that it opens backwards.  Unfold your new privacy divider, insert confidential info into the binder, and close the folder over your documents (scroll up to the first picture to see two finished product).  The privacy divider can easily be kept closed using a paper clip or two!


What easy ways have you found to solve your everyday organizational problems?


Share with us by leaving a comment!

If you liked this organizational tip, 
check out my ideas on labeling systemsorganizing paperwork, and favorite problem-solving items!

Thursday, March 31, 2016

26 classes of projects? Oh my!

by Elizabeth Van Allen  for scribblesbyartteachervanallen.blogspot.com
 
I hang up 'no name'
projects on clotheslines
near the door so there's
no missing them!
Keeping 26 classes of students straight is no easy task.  Every week I teach between 590 & 700 students, depending on this year's enrollment.  Getting all of their names right might a challenge, but it's a piece of cake compared to keeping track of their artwork!  

I'm going to go all interdisciplinary and do a little math: if each student is working on a project that involves a planning paper and a good paper, that's between 1180 and 1400 pieces of paper in play at any given time.  Now add their journals and past projects that are ready to be given back, and factor in students who forget to (or can't) put their name on their work.  If you don't have a good organizational system in place from day one, you're drowning in random papers and upset students.

After years of trial and error, I've finally come up with a system that works for me.  Hopefully there is something here that you can use to improve your systems and iron out any issues you may be having!
 
The secret to success: insist on
clear, thorough labeling of all projects!
Student Accountability
My students are all pretty familiar with these phrases:
No Name=No Grade
Leave it out=Lose it
Not put back=Not the teacher's fault
Once students realize that I actually say what I mean and I mean what I say, we have very few issues with missing projects.

Organization by Day & Class 
Storage for Monday's classes
Say it with me folks... color coding.  My storage cabinets are organized by weekday, then each class has a recycled cardboard container from a big box store that's wrapped with colored duct tape.  Red for the Kinders, orange for grades 1-2, yellow indicates special education, green says grades 3-4, blue means grades 5-6 and purple is for my 7th and 8th graders.  First class of the day is on the top shelf and last class goes on the bottom.  Every box has the weekday, class, teacher, period, and grade level printed on the tape.
Note: this color coding system is just for me.  If I shared it with the students it would just confuse them because their rows are color coded too!

Keeping Track of Classwork

Above: Color-coded row folders
Below: Color-coded table tags
Organizing smaller 2D projects and journals by row or group helps keep papers in the right place.  It also makes it easier to distribute and collect them when the time comes.  Make sure everything is clearly and boldly labeled to prevent the frustration of re-explaining and re-organizing!  My students sit in 4 rows: red, yellow, blue, and green.  I label everything that goes out to them based on their row name/color, from their storage folders to their supply baskets.  I even have them write their row color on the back of their projects right next to their name, class and date!  This may sound like overkill, but if (or when) a project is misplaced this makes it way easier to re-file without wasting lots of time.

No matter how well you are organized there is always room for improvement.  Each school year brings it's own challenges, so when it comes to organization I'm always adjusting something.  Click on these links to see some of my ideas on assignment boards, materials and handouts, streamlining seating charts & paperwork, and grading methods.


What was your most successful organizational adjustment? 

Thursday, March 24, 2016

Prepare for Art Teachering Success!

by Elizabeth Van Allen for scribblesbyartteachervanallen.blogspot.com

Being a good teacher is hard work, but being a successful teacher takes some serious trial-and-error.  As a gift to other art teachers out there, I'd like to share ten tips and hard-learned lessons I've learned that make my everyday teacherin' life a little bit easier.  Everyone makes mistakes (see #10), but in sharing my experiences I hope to help other teachers enjoy more moments of success and better preservation of their sanity.
Preparing to Succeed
An Art Teacher's Guide

My grab-and-go kit: Rory's Story Cubes,
color & shape bingo, Beautiful Oops, paper,
instructions for simple book making projects,
crayons, colored pencils, and coloring pages.
1. Have a grab-and-go class coverage kit ready at all times
When another teacher's parent conference or last-minute absence happens during your prep period, you might get called on to cover their class.  Getting advance notice of a coverage is often a luxury, so prepare yourself with activities that are suitable for a variety of ages and are easy to modify!

2. Always leave your classroom sub-ready
You never know what is going to happen after you exit school for the day, so make sure that nothing is left to chance.  Lock up things that are not for students, have sub plans easily accessible, and make sure the room is tidy.

3. Streamline your paperwork
I like to have frequently used data at my fingertips.  Behavioral notes & attendance are on my seating chart, and contact info & grades are on a roster sheet.  The pages face each other in my binder for easy access.
4. Find an organizational system that is easy to maintain, then stick with it
Have easy-to-understand systems for organizing student work, paperwork, and student procedures. Being disorganized in an art room is like trying to clean up a gallon of paint with one paper towel.  It might work eventually, but you'll have a heck of a mess on your hands!

5. Keep guidelines clear and simple
When you clearly post simple rules and procedures, you eliminate confusion and frustration for you and your students!
6. If a student can do something, let them
There is no reason to clutter your mind with project distribution when you are tasked with facilitating the education of 30+ students while also keeping them safe.  Use your first few classes to teach and reinforce classroom rules adn procedures, then hold them accountable.  Make your classroom a more student-driven educational environment while keeping your eyes and ears open for teachable moments and potential issues!

7. Common sense is not the same for everyone
Positively worded rules get better results!
Dictionary.com defines common sense as sound practical judgment that is independent of specialized knowledge, training, or the like; normal native intelligence.  Remember: sound and practical looks very different to an adult from the suburbs than it does to child from the inner city. 
8. Become indispensable
When school and district budgets get tight, art education is one of the first areas to get cut.  This is often due to the perceived expense of running a quality program.  Make yourself an important part of your school's culture and a valued member of the school community by volunteering for initiatives and building committees.  Being an intrenched, highly visible, and POSITIVE influence makes keeping you in your position a higher priority.
My art advocacy bulletin board 
features Eisner, Gardner, and 
tons of art-based career choices!
9. Be an informed advocate
Advocating for your subject, program, and students makes you a force for positive change.  Gandhi is often quoted as having said "Be the change you wish to see in world." Show, tell, and demonstrate why and how art is important, but check your facts first.  If you're not sure where to start, try looking up the philosophy research of Elliot Eisner through reading his work or hearing him speak.  You can also print a copy of his 10 lessons the arts teach to post in your classroom!

10. Learn from your mistakes
We all make mistakes, it's part of life.  The biggest mistake that I made during my first few years as an art teacher was taking myself too seriously.  It stunted the development of my relationships with both my students and other adults.  The first few years of teaching is hard enough as it is, I made my own life far more difficult than it should have been by leaving my sense of humor at home.  Recognize when you've made a mistake and take the time you need to reflect.  What went wrong?  How it could be fixed or done better in the future?  Ask for help when you need it and don't forget to celebrate your victories... you earned them!

Bonus tip: Test run every project with the exact same supplies that your students will be using.  It may be a pain in the neck, but troubleshooting your lessons in advance makes for a much smoother and enjoyable classroom experience for everyone!


What would you add to the list?
Share with us by commenting below!

Thursday, January 15, 2015

Cure Chronic Same-question-itis!

http://exhibits.hsl.virginia.edu/nerves/
by Elizabeth Van Allen 
scribblesbyartteachervanallen.blogspot.com

Are you tired of hearing the same questions from students that you've heard a hundred times before?  Do you have to resist a frequent urge to scream "How didn't you hear me the first 3 times!?"  Do you wake yourself up at night uttering phrases you never thought you'd say outside of the classroom?  If you answered yes to any of these questions, you might have Samequestionitis.

Samequestionitis is a common ailment among teachers.  Side effects include general irritation, the urge to walk away from raised hands, and pulling out your own hair in response to persistently feeling as if you're talking to a wall.  If left untreated, this ailment could lead to consistently bad days, louder-than-is-socially-acceptable vocal volume levels and increased blood pressure due to chronic frustration.  
http://bestteacherblog.com/funny-teacher-memes/
Elementary Samequestionitis Cure
There is a cure!  Clear visual examples and easy to read directions in a dedicated area of your classroom will clear up most side effects within a short period of time (results may vary).  Avoid developing tennis elbow due to repeated pointing motions towards your new board by using phrases like "take a look at the direction board" or "Where could you find the answer to that question on your own?"  In rooms that cater to several different grades or age groups, try breaking up a bulletin board into several sections with wide ribbons or bright sentence strips.  If students still don't get the hint, try posting giant neon arrows with phrases like 'look here' and 'your questions answered here'.  If all else fails, make a hand held sign that says 'read the directions'.
Middle School Samequestionitis Cure / Project Board

 What solutions have you found for the common ailments native to your workplace?

Thursday, November 13, 2014

Paint Brush Etiquette: Gentle Reminders

by Elizabeth Van Allen
for scribblesbyartteachervanallen.blogspot.com/

When I first started teaching, I was adamant that all students must clean their own brushes every time because it was a necessary art room skill.  While I still agree with the sentiment, practicality has gotten in the way of high-fallutin' art making ethics.  Even with two (theoretically clog-free) sinks that each comfortably fit two students (at them, not in them), there is just not enough time for that when I only see them for one 45 minute period once a week!


My solution/compromise was to have two volunteers clean up the water cups and paint brushes at the end of the class period.  And when they don't volunteer you better be I volun-choose them, usually based on who is singling themselves out behaviorally that day.  I choose one from each side of the room, assign them rows to collect from, and exclusively dedicate one sink to their cause.  Let's call it a semi-private cleaning station. 
I got this brush cleaning
poster years ago as a
conference freebie
 

The problem: wasting time repeating directions to every new set of brush cleaners!  The solution: explain the job as part of the paint demonstration directions, have them repeat it back (check for understanding), and making/posting gentle reminders in strategic places.

Unintentional side effects did occur.  
They include:
  • Shortened clean-up time (you have to be really sneaky or, as they say around here hard headed, to keep working when someone else has already taken your water and your brushes)
  • Competition over who gets to clean (while this seemed unimaginable to me in my childhood, many of my students LOVE cleaning my room)
  • Student-created cleaning chores (see last side effect- they've blindsided me with "I'm your official sweeper today" or "I'm your table cleaner" or -my favorite- "can I collect all of the paint/newspapers/rulers?" Knock me over with a feather!) 

What changes and compromises have you made for the sake of time management?  

Tuesday, October 28, 2014

Art Room Transformation


Welcome to the Art Studio!
by Elizabeth Van Allen
for scribblesbyartteachervanallen.blogspot.com/

My art room is the size of a gym.  I'm certainly not complaining, even with the acoustical drawbacks (I have 2 story high ceilings- great for singing, horrible for talking) I really wouldn't trade it for anything.  Putting together a classroom is no easy feat for any teacher, but I feel that I have a unique challenge at the end of August before school starts each year.  


Your view as you enter the room

Taking such an enormous space and making it feel inviting while taking traffic patterns into account often feels monumental.   Especially since the room has to be left as a blank slate every June!  I may be a little late in the year for this type of post, but hopefully you can get a little inspiration as your own classrooms evolve through the school year.

The View From Our Sinks
Working Area: Before
Working Area: In Progress

Working Area: Finished

 From Above 
A whole new challenge: keeping students off an in-class stairway
From Above: In Progress
From Above: Before


From Above: Finished

The Studio
My biggest challenge: What do you do with a classroom-sized empty space with very little available furniture, and how do you keep it from becoming a race track / impromptu break dancing space?
This big empty space
could be a total nightmare...
High top tables with stools for two
with elementary age students gives me
uninvited premonitions of cracked skulls!
 ...so I moved some flat files and cabinets to break up the space without creating 
line-of-sight issues and added ribbons with clothespins to hang up lost projects! 
The high top tables serve two purposes:  as a quiet work area for older students and as a physical barrier between the carpets and projects drying on the countertops.

The carpet area mimics the area the younger grades have in their regular classrooms.  It's great for introducing book-based projects 
The carpet space is color-coded in the same way as the table rows in the work area.  This way I can keep younger students who have issues with each other apart and transition students to the other side of the room in an orderly fashion without having to remember names off the top of my head! 

 What unique challenges do you face in organizing your teaching or work space?

Thursday, October 23, 2014

Easy & Versatile Labeling System

by Elizabeth Van Allen
for scribblesbyartteachervanallen.blogspot.com/

For years I have been labeling bins and baskets for one purpose, then removing and re-labeling over and over.  It gets frustrating to keep removing and re-making perfectly good labels. Let's face it folks, it's not possible for an art teacher to have enough wire baskets or sturdy plastic boxes for all of our storage needs.  We use them for everything!  I finally found a cheap & easy way to make easy on/off, reusable tags that work with just about any container. 

Supplies:
  • paper scraps to make the labels
  • hole puncher
  • clear packing tape or a handy dandy personal-sized laminator (I got mine at BJ's wholesale club for under $30 last year)
  • markers or paint pens
  • gutter hooks (the kind you use to hang Christmas lights)
Process:
  1. Go to any retailer that sells outdoor or holiday items and buy gutter hooks.  They come in many different sizes and shapes and are super cheap.  Keep in mind the average size of the containers you are labeling when choosing the size of your hooks.  
    • If you are patient (or buy sale items on impulse that you know you might desperately need at some point but you're not sure when or for what), look for these just after the winter holidays - I got mine for pocket change in late December.
  2. Make your labels, keeping mind the average size of your containers and the length of your gutter hooks.  As a point of reference, these metal baskets comfortably hold 9x12 paper and the signs I made for them are 1 inch high by 8 inches long.
  3. Laminate your labels or seal them front and back with clear packing tape.
  4. Hole punch the labels.  Keep the holes the same distance from the top and make sure the gutter hook will fit through that size hole.  Experiment first with a label you messed up (we all know there will be one or two, who are you trying to fool?). 
  5. Label your containers!

Storage: Leave your hooks on the baskets and store your labels on a binder ring somewhere obvious and out of the way.


What minor changes have you made in your classroom or office to simplify your day-to-day routine?