Showing posts with label art project. Show all posts

Monday, May 18, 2020

Elementary Choice: Name Spiral or Mega Line

by Elizabeth Van Allen for scribblesbyartteachervanallen.blogspot.com 
choices imagined by art teachers and edited by the author

SubjectElementary art, E-learning, Choice learning
LevelElementary

Monday, May 11, 2020

Elementary Choice: Page of Shapes or Silly Socks

by Elizabeth Van Allen for scribblesbyartteachervanallen.blogspot.com 
choices imagined by art teachers and edited by the author

SubjectElementary art, E-learning, Choice learning
LevelElementary

Monday, May 4, 2020

Elementary Choice: Cardboard Roll Sculpture or Interstellar Travel Agent

by Elizabeth Van Allen for scribblesbyartteachervanallen.blogspot.com 
choices imagined by art teachers and edited by the author

SubjectElementary art, E-learning, Choice learning
LevelElementary

Wednesday, April 29, 2020

Value Scale Scavenger Hunt

by Elizabeth Van Allen for scribblesbyartteachervanallen.blogspot.com 
Original idea from the Facebook Art Teachers Group, the Art of Education site, and Art with Trista
Subject2D art, e-learning
Level:middle school +/-

For a visual example of how to do this, see 
Art with Trista's Found Object Value Scale on youtube by clicking here

Monday, April 27, 2020

Elementary Choice: Mandalas, Story Characters, and Food Having Fun

by Elizabeth Van Allen for scribblesbyartteachervanallen.blogspot.com 
choices edited by the author

SubjectElementary art, E-learning, Choice learning
LevelElementary

Monday 4/27/20-Sunday 5/03/20


You can choose any activity on the list below for your weekly art class. Use whatever materials you have at home. Write your name and the name of the activity you choose on your project.

Wednesday, April 22, 2020

Letters Around Us

by Elizabeth Van Allen for scribblesbyartteachervanallen.blogspot.com 

Subject2D art, e-learning
Level:middle school +/-

Tuesday, April 21, 2020

Elementary Choice: Cartoon Faces, Origami, and Landscapes

by Elizabeth Van Allen for scribblesbyartteachervanallen.blogspot.com 
choices by Carrie Johnson, edited by Elizabeth T. Van Allen

Subject: Elementary art, E-learning, Choice learning
LevelElementary

Elementary Choice Activities: Cartoon Faces, Origami, and Landscapes
Tuesday 4/21/20-Sunday 4/26/20


You can choose any activity on the list below for your weekly art class. Use whatever materials you have at home. Write your name and the name of the activity you choose on your project.

Wednesday, April 8, 2020

Choice Drawing: Middle School

by Elizabeth Van Allen for scribblesbyartteachervanallen.blogspot.com 

Subject: 2D art, e-learning
Level:middle school and older

Tuesday, April 7, 2020

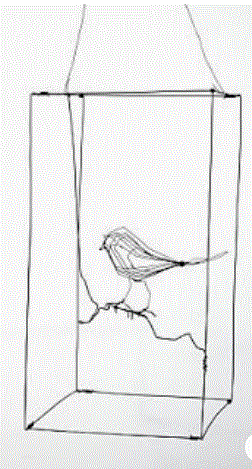
This Sculpture is For the Birds!

by Elizabeth Van Allen for scribblesbyartteachervanallen.blogspot.com 

Subject3D art, e-learning
Level:middle school, but can be modified for almost any age 


This Sculpture is for the Birds!
 In-The-Round Sculpture Using Available Resources
OBJECTIVES:

I will create one recognizable sculpture in-the-round of a bird from an original 4-view drawing using my available resources.  My sculpture may be lasting or impermanent, small or large
So that I understand how to work with limited resources in order to accomplish a concrete goal
I will know I have it right when I have created a sculpture of a bird using the resources that I have available to me, and it is clearly recognizable to any viewer.

REQUIREMENTS:
Students will:
1. Brainstorm­­­­­­ 2 ideas for your bird sculpture (different positions or species).
2. Choose 1 sketch and draw it from 4 different views: front, side, back, and top.  .
3. Submit sketches through EDSBY
4. Re-create the drawing in sculpture form
5. Photograph the sculptures from all 4 angles that were originally drawn
6. Complete the project in a timely manner
7. Submit pictures from all 4 angles that you drew to the teacher through EDSBY
8. Clean up

TIME BUDGET:
7 working classes:
1 class- Sketch
2 classes- 4-View Drawings
4 classes- Sculpture

VOCABULARY:

Sculpture In-The-Round sculpture that is meant to be viewed from all angles
Consumable Resources – Objects or materials that are meant to be used up and replaced (paints are consumable resources, paint brushes are non-consumable)
Found Object – objects or products that are not normally considered materials from which art is made often because they already have a non-art function.
Multi-View DrawingA multi-view drawing is one that shows two or more two-dimensional views of a three-dimensional object. • Multi-view drawings provide the shape description of an object. • When combined with dimensions, multi- view drawings serve as the main form of communication between designers and manufacturers.
Sketch – a quick or rough drawing an artist makes to express ideas that are intended to be used in later works
Impermanent Art (also called temporary art) – art that is not intended to be permanent or last a long time

MATERIALS:
 ·  paper
·  pencil or pen
·  Objects from around the house and/or consumable art supplies
·  Camera/camera phone
·  Computer


DIRECTIONS
1.    Read the lesson plan thoroughly, including all vocabulary
2.    Brainstorm­­­­­­: Sketch out 2 ideas for your bird sculpture (different positions or species).  Think about your project- do you want to show your bird flying, nesting, walking, floating, etc.?  What type of bird do you want to show- tropical, migrating, non-flying, common, exotic, etc.?  Keep in mind the materials you have available to work with while you are brainstorming.
Even though this isn't a
bird, it's a great example
of a 4-view drawing!
3.    Choose 1 idea/sketch and draw it from 4 different  views: front, side,back, and top.  Sketches must be to scale with each other, and be drawn on the same page as each other.  Your 4 drawings should take up the entire page/ each sketch uses ¼ page.  HINT: if you’re having a difficult time with the 4-view drawing, look up images of wood carving patterns and bird decoy patterns.  Using these multi-view drawings is standard when creating sculpture and wood carving, and images like this are very common!

4.    Submit sketches through EDSBY
5.    Collect, with permission, materials from around the house to use for your sculpture.  If you are using consumable resources (paint, air-dry clay, foil, paper, tape, wire, etc.), make sure you have a dedicated working area that can be used for this purpose.

6.    CAREFULLY re-create the drawings in sculpture form, checking each view for accuracy according to your original drawings.
7.    Photograph the sculptures from different angles
8.    Complete the project in a timely manner
9.    Submit pictures from all 4 views that you drew to the teacher through EDSBY
10. Clean up 

REFLECTION QUESTIONS 
for after assembling your bird sculpture
(to be completed as a survey in EDSBY):

1.    What surprised you when making your sculpture?

2.    When creating your sculpture, what was the easiest part for you?


3.    When creating your sculpture, what was the most difficult part for you?

4.    Which part of your sculpture do you think was the most successful and why?

5.    Which part of your sculpture do you think was the least successful and why?

6.    If you were to do this again, what would you do differently?

SUNSHINE STATE STANDARDS
VA.68.C.2.1 Assess personal artwork during production to determine areas of success and needed change for achieving self-directed or specified goals.
VA.5.O.1.2 Organize the structural elements of art to achieve visual unity.
VA.68.O.1.3 Combine creative and technical knowledge to produce visually strong works of art.
VA.5.F.1.1 Examine and experiment with traditional uses of media to apply imaginative techniques in two- and/or three- dimensional artworks 

Monday, April 6, 2020

Found Object Color Wheel & Still Life: Week 2 of 2

by Elizabeth Van Allen for scribblesbyartteachervanallen.blogspot.com 
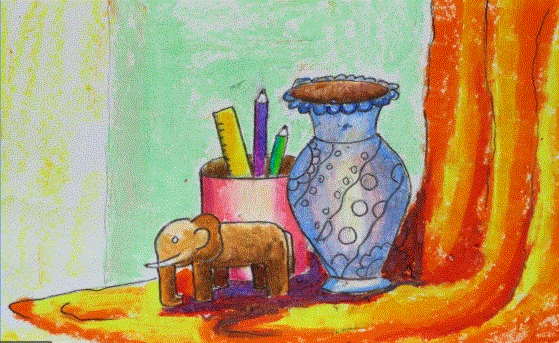
Drawing a still life requires that
 you look directly at the objects,
not draw them from memory.


This 2-part lesson is suggested for grades 4-5 e-learning, homeschool, or in the traditional classroom.  Part 1 can be done with all ages and part 2 is suggested for grades 3 and up.  This lesson was Modified from an original lesson by Ms. Hartnett from Shore Elementary School in Tampa, FL.  To see her original lesson, find her on youtube here!

Find week 1 of 
this lesson here.


WEEK 2: THE STILL LIFE

Create a fun still life by drawing objects you collected for your found object color wheel!

VOCABULARY:
Composition - the placement or arrangement of visual elements or 'ingredients' in a work of art

Still Life - A still-life is a picture of objects that don’t move. Often vases, bowls of fruit, bottles, etc.  The artist sets up a still-life usually in the studio to do a ‘study’ of the objects.  It may be a drawing or a painting.  The artist looks at the objects and studies their shape, where the light falls, and the shadows the objects make in relation to the other objects.

 DIRECTIONS

1.  After you have taken a picture of your color wheel, choose 3 or more objects that you would like to draw together and set them aside.
2.  CLEAN UP your color wheel by putting back your color wheel objects EXACTLY WHERE YOU FOUND THEM
3.  Arrange the objects you set aside into a composition that you find pleasing.  Groupings of odd numbers , even numbered groupings arranged in a diamond shape, and having taller objects in the back and smaller ones in the front are traditional ways to make your composition look  great!
4.  Start drawing your objects by sketching them lightly in pencil, paying attention to the simple shapes that most closely resemble your items.  (example: when drawing a can of soup, you could start with a tall rectangle) Don’t forget to sketch in your background, and make sure you fill in the whole paper- make those objects nice and big on your paper!
5.  Once your objects are sketched in as simple shapes, start refining the edges and adding bigger details.(example: if you started your can of soup as a rectangle, make the top edge into a flattened oval/elipse and the bottom edge into a curve)
6.  The next step is drawing in the details on your objects.  (example: what is on the soup can’s label? Are the top and bottom edges a little wider than the rest of the can?  If you are including words, don’t forget to show the curve of the can by curving the words!)
7.  If available, start adding color.  If you have no color available, try shading with a pencil or pen!  Pay close attention to your lighting.  Is one side of your objects lighter or darker than the other?  Are there any shadows?  What direction are they going in?

REFLECTION QUESTIONS 
for after you finish creating your still life:

1.    When creating this still life, what was the easiest part for you?

2.    When creating this still life, what was the most difficult part for you?

3.    How did you work your way through the tough parts?

4.    How do you feel about the finished project?

SUNSHINE STATE STANDARDS

VA.K.S.3.1, VA.1.S.3.1, VA.2.S.3.1, VA.3.S.3.1, VA.4.S.3.1, VA.5.S.3.1

RESOURCES

For even more detailed instructions about how to draw a still life: 
(lots of pop-up ads, but good info)
https://feltmagnet.com/drawing/How-to-Draw-Still-Life
Some images are from: 
http://www.artstudioguelph.com/still-life-composition/
https://www.youtube.com/watch?v=usmpfAO18Io

Choose-Your-Own-Drawing! grade 1-3

by Elizabeth Van Allen for scribblesbyartteachervanallen.blogspot.com 

Subject Art/Drawing, e-learning
Level:grade 1-3but can be modified for almost any age 


Monday, March 30, 2020

Treasure Maps: Pirate Fun For All!

by Elizabeth Van Allen for scribblesbyartteachervanallen.blogspot.com
*first posted in 2016, this lesson has been updated for grades 2-3 e-learning in 2020, but can be used & modified for any and all grade levels
This exceptional project from a first grader used multiple points of view!
What's mysterious, full of intrigue, and lots of fun to both make and use?  A Treasure Map, of course!  Maps have been used for thousands of years around the world in all different cultures as a tool to help communicate location from one person to another without having to speak directly to them.  During our standardized testing window one year I decided to create a project that could be modified to be appropriate for all ages.  All you need to do is keep it simple for younger artists & add more challenging details for older ones.  In 2020 I realized that it was also a perfect project for all of my safer-at-home E-Learners! This treasure map project can be made as simple or complicated as you want, and can be tied in with geography/social studies, math, language arts, and/or science.  It can be made in any language and with any materials available, with lots of mess or an easy clean-up.  The treasure map is an easy way to build student buy-in in the classroom or involve & excite kids (and adults) at home. 
Rampello K-8's Spirit Week Map

Materials:
  • Practice paper
  • Pencil & Eraser
  • Paper for the map (white, manilla, brown paper bag, tea-stained, textured, any type and size you want to use!)
  • Drawing media that shows up well against your background paper (markers, paints, oil pastels, crayons, construction paper crayons, etc.)
    A little sparkle or shine goes a long 
    way!  We used dried markers to 
    apply tiny metallic tempera details. 

  • Optional: metallic paint, glitter glue, sequins, ribbon or yarn, magazines for collaging, really anything you have laying around the house.  Get creative & crafty, or at least give them the opportunity to do so! 
This second grader
included a map key!

Good To Have On Hand: 
(Resources & Preventative Measures)
  • Compass Rose
  • Map- any type will do, just check your car's glove box!  This comes in handy as a real-life example of how a compass rose, map key, and areal view can be used.  This is also a great tie-in with geography and giving & writing directions.
  • Old fashioned map examples with sea creatures and symbols. (find online)
  • Smock/apron and wipes or damp paper towels (if using paint or glue)
  • Newspaper or large plastic place mats (for easy clean-up)
One of my favorite "hazard" details from a very creative first grader
Process/Directions:
Third grade compass rose
  1. If you are tea-staining or aging your paper in any way, do this first and practice drawing any details you want to include while the paper dries.
  2. Decide on a size and shape for your paper.  Are the edges torn or cut?  Will it be rolled into a scroll or folded?
  3. Draw a compass rose near one of the corners (good opportunity for a geography cross curricular tie-in)
  4. Draw an island, archipelago, peninsula, or shoreline- basically you want part of your map to be land and part should be water.
  5. X marks the spot!  Experiment with different ways to show your X: wooden planks, swords, palm trees, old-timey lettering etc. 
    I am still amazed that a
    first grader drew this!
  6. Place your ship off the coast.  It can be anything from a dinghy to a multi-masted tall ship.  Don't feel limited to drawing, you can cut and paste from a printout or collage together a boat if you're so inclined!   
  7. Represent different geographical landmarks through drawing or collage (trees, caves, quicksand, cliffs, rocks, mountains, volcanoes, rivers, waterfalls, ponds, swamps, etc.)
  8. Draw a dotted line from your docking point to the X, winding it through and around the geography of your island.
  9. Show the water on the map through different types of waves.
    A great example from a fifth grade
    artist showing waves just off-shore.
     One good way to show water is through a set of layered dashed lines clinging tightly to the shoreline.  Start them small and tight near the shore, then loosen and lengthen them a few layers out.
  10. Add in some details like sea monsters, canons on deck, flags, treasure chests etc. 
 SUNSHINE STATE STANDARDS
VA.2.C.2.1- Use appropriate decision-making skills to meet intended artistic objectives.
VA.2.S.1.1- Experiment with tools and techniques as part of art-making processes.
VA.2.S.3.2- Demonstrate growth in craftsmanship through purposeful practice.
VA.2.H.2.1- Identify differences or similarities in artworks across time and culture.
VA.2.F.1.1- Use imagination to create unique artwork incorporating personal ideas and selected media.

This fourth grader really got into the details on her map!